90 Second Video

FINISHING PRODUCT


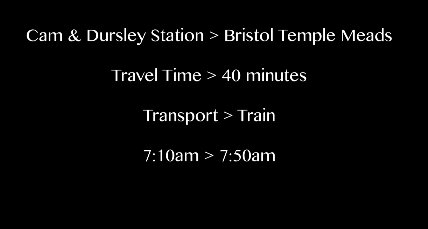
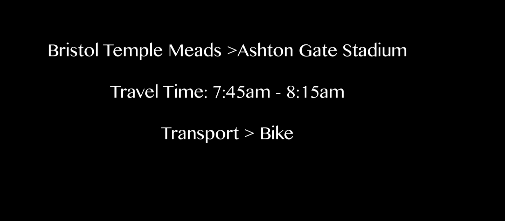
Overall, I am pleased with this final product. I wouldn’t say completely happy because I’ve seen some awesome traveling videos and mine definitely doesn’t live up to this. If I had more time and the student had more time, I would film him on his journey with him so I can get more professional shots of him cycling etc. I think the text overlays that have the information of Connor’s key travel points are a big help especially taking into account the target audience. It doesn’t look as professional but the target audience are young male and females so having the video too professional would have not engaged them or related to them enough. Through the video diary, the target audience looking to attend this particular audience may think ‘Oooh I can do that, I like to cycle, I get the train everywhere, if he cane do it then so can I”.

One massive part I hate is the ending. Connor, the subject, filmed himself saying “I made it to college” then looked out the window and said “oh crap” and stopped filming. As a result of this, I could not have the smooth ending to the video that I would have wanted which is a great shame. So that is the reason the ending sounds as though it was cut short….because it was. But there was nothing I could do about it ufortunately!

I’m excited for what the future holds and there will definitely be some more home-made videos in that bracket! A massive thank you to my lectures for the new learning and information shown in order for me to produce these videos. It’s all been a huge learning curve!

Titles

Screen Shot 2018-01-12 at 11.57.19Screen Shot 2018-01-12 at 11.57.21Screen Shot 2018-01-12 at 12.00.25

The reason I chose to use text titles and overlap them on the matching moving image was for a great reason. As this video is also being used by Bristol City Community Trust, I know the target audience is students that will be graduating from school and looking to come to their college to learn. As a result of this, this video in particularly will be shown at Open Evenings and Days. There is lots of noise when it comes to this therefore having text allows the audience in the room to still understand the story of what’s going on in the video even if the sound is not so well heard. The text has the key points about Connor’s journey as well as the time it takes to get to college. All of this just magnifies the effort it takes to attend this college. And that is why I chose to include text.

90 Second Video

For the 90 Second Video, I used a similar style to the 3 minute one. Smooth transitions between sound and imagery are definitely the better style to go for. It’s smoother, the story flows and the audience won’t notice a change in story focus on anything they shouldn’t when watching this.

Again, with the use of dialogue over different graphics, I am able to insert more images and videos into the 90 seconds than if it were the matching video for the audio. The dipping to black was a wise choice I believe because it illustrates the ending of the scene. For example, the dip to black after Connor leaves the house to get in the car. The next shot is then the car scene, then dip to black and he is at the train station. It conveys the story in a better light instead of just jumping around to the next clip.


3 Minute Video

THE FINISHING PRODUCT


I’m really pleased with the final outcome for the 3 minute video. I used a range of cameras, shots, heights and motion in one video. I was nervous about making videos but I’ve always done it on my iPhone for holidays etc. This was a lot more enjoyable than I realised. I need to work on the audio, I don’t particularly enjoy the background noise, I believe it looks a lot better with music, however, this was not in the brief unfortunately. I would like to think the dialogue audio adjustments were smooth and professional as possible fora  student to achieve! I am definitely keen to learn more and make more videos for more personal project, I have taken a huge liking to this!

In future I will:

  • come with more audio backup/prepartion
  • Use more camera lenses
  • Be more confident when shooting
  • Try different camera angles when shooting an interview

Audio Levels

Audio || Up & Down

Here is a different set of audio editing. I entered key frames in order to decrease or increase the sound in conjunction to the dialogue going on above. The background sound obviously needs to be lowered in order to hear the interview audio. Why did I set the background noise to low level and not no level? After watching a wide range of video audio, the videos in which background noise was not present were the more charismatic, atmospheric, intimate interviews with people with a deep meaningful story going on. Mine is not that feelings. The PFA meeting is a more serious, professional look and I believe having a subtle background sound narrows out the deep side and creates a more professional sounding video.

Text

Screen Shot 2018-01-12 at 11.09.23Screen Shot 2018-01-12 at 11.09.44

These are screenshots of the text overlays. This was a consistent theme I used throughout the video as consistency is key to engagement. I used a ‘dip to black’ transition for the text as I wanted it to appear smoothly onto the interview graphic. Not only this, but it also has a ‘dip to black’ fade at the end of the text clip too if the clip has not transitioned to a different shot. I believe this is the most professional look to a transition when introducing a subject to the audience. It’s also the most used tool I’ve seen in the videos I have watched when having people interviewed.

Audio Overlays

DIALOGUE VS GRAPHIC

Screen Shot 2018-01-12 at 10.57.10Screen Shot 2018-01-12 at 10.57.38Screen Shot 2018-01-12 at 10.57.45


As you can see from the images above, the blue audio script is the dialogue of the interviews throughout the day. The green is the background noise of the meeting. The image with the red seats is the image that matches the blue audio so as you can see from the screenshots, the audio overlays other graphic from the day. This is a useful tool to use to keep the audience engaged with what the video is portraying, it lifts the ideology of the message at what the video entails.

It was much easier after using the Rode Mic to unlink the audio and delete, move, trim etc. Which would’ve been more difficult if I used a zoom mic to record this. I could have possibly set up the zoom mic in case of back up if the rode mic didn’t work so this was careless of me. However, lucky for me it went well but in the future I will be using more than one type of recording at once.

Interview Set Up

Screen Shot 2018-01-11 at 10.08.56 pm

This is the set up I endured when conducting the interview. I believed this was the best set up as it was about a minute/two minute long interviews. I believe after researching, having the subject look at me at an angle instead of the camera. I think thats for more atmospheric based videos whereas mine is a very educational one. As in professional videos and documentaries, there are multiple different cameras at different angles when shooting one interview.  I wanted to recreate this with only one camera so instead of fidgiting during an interview, I changed the angle per interview so it reflects the different perspective of the individual.

Shots

Types of Shots

After re-evaluation the 3 minute video, I have been wary of an audience that may think there is not a wide variety of shots. However, I carefully thought about this pre-shoot due to the fact personally I don’t think it would be appropriate to shoot close ups of a video about football college academies all over the country and how they can work together to create something substantial. Close ups defeat the point of wide, panning shots to create an illustration of the holistic, bigger picture of this meeting. Establishing shots were used in the beginning of the video to depict the size of the club, to capture the eyes of the audience straight away that this is actually an interesting video. The best bit about this meeting, is there are clubs with huge backgrounds like Bristol City, then there’s Cheltenham FC who only have one class in their college set up compared to Bristol who have at least 8! THat’s why establishing shots, wide angle and panning motions are used to capture a society working together for the bigger picture of the future of our children.

IMG_8476IMG_8478IMG_8500

Microphones

Zoom or Rode?

The two microphones I took with me to the PFA meeting were both very useful for two different reasons. The zoom mic I placed at the front of the room when someone was talking and in the middle of the room when there was a conversation/activity across the board happening. The was then used as my background audio that was consistent throughout the video as the ambient noise.

The Rode mic was used on my camera, plugged in the whole time to ensure full audio level when talking to interviewees or someone talking at the front of the room to everyone. The rode mic picked up sound way better than I had originally expected. However, when conducting the interviews outside, it also picked up loud noises of cars driving, beeping, birds, horns etc. I tried my hardest adjusting the audio on Premiere Pro but it’s near impossible to dim down the ambient sound of the outside world. The Rode was easy to use and I didn’t have to stress about it so I am very happy with using that again!